
Hello, world! 👋
We have fantastic news to share with you about our Python RPA tools. Follow this article.
[0] Tasks information
You can now track the task in a new view format, highlighting the execution time and the time in the queue.
To enter the information screen, click the icon with three dots in the upper right corner of the task card available on the task queue screen. You will get the “information” option when you click on this icon. Click on this option.

When you enter the task information screen, you can identify five cards. The third refers to the time in the queue and the fourth refers to the execution time.

Explaining further:
- time in queue: means the time the task was in the queue waiting to be executed, from when it was created until the moment it started executing;
- execution time: means the time the task took to execute.
[1] Minimum execution date
Did you know that you can determine a minimum date for the execution of your automation tasks? Follow the step by step.
When creating a new automation-related task, you can choose a minimum date for your bot to run. On the new task screen, identify the “minimum run date” field and select the desired date and time.

Creating an example, considering the current date 11/04/2023, let’s set the minimum date to 04/12/2023, 00:00.

In the queue, the task we have just created is in an “In Queue” status until the correct date and time for its execution.

[2] Integration with Microsoft Teams
In addition to other integrations with other communication tools, it is now possible to integrate with Microsoft Teams. Understand step by step how to configure it correctly.
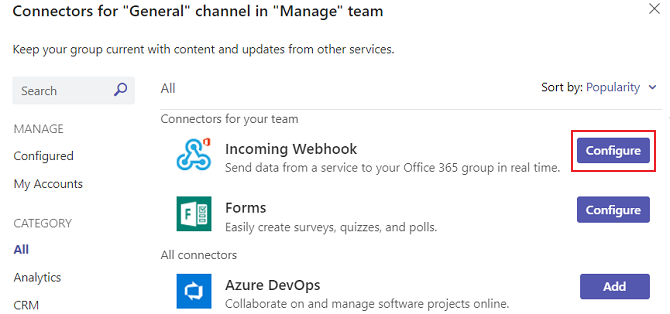
Create a team or go to a team where you want the alerts sent. In the upper right corner, identify the icon with three dots. Click on it, and then click on “Connectors”.

In the search field of the new screen, type “Incoming Webhook”. The result will show the option as in the screenshot below. After identifying the correct option, click on the “configure” button.
You must fill in the required information with the new screen that has opened. And be sure to copy the generated URL. The URL maps the channel and you can use it to send information to Teams.
After that, you should go to the BotCity Maestro. On the left side menu, identify the “Administration” category and, within it, the “Integrations” option.

There will be a “Microsoft Teams url” option. You will have to paste the URL generated in the team into this field. After that, you can set up the alerts as usual. And they will also be directed to the team you have selected.
[3] Interrupt or terminate the running task
In addition, to interrupt a task, you can also terminate its execution when necessary.
First, let’s understand the difference between interrupting and terminating a task:
- interrupt: if you have a handle in your automation code for when you receive requests of this type, the task will handle it when it is interrupted;
- terminate: in this case, the runner will finish the task, forcing the execution to terminate, regardless of the stage the task is at.
To do this via BotCity Maestro’s graphical interface, you can go to the task you want to interrupt or terminate, identify the icon with three dots in the upper right corner, click on it, and choose the option that makes the most sense for your need.

[4] Execution of other types of bots
You already knew you could run automation built in Python, Java, and JavaScript. But now you can run and orchestrate any robot, for example, bash or bat files, among many others.
You can do the “easy deploy” as usual by accessing this option from the left side menu in BotCity Maestro. Then add the bot file. And, in the “What is the bot technology?” field, select the “Command” option. And in the “What is the command to run?” field, write the script for running the type of robot you are making available.

Please pay attention to the command to execute, whether one or more parameters are needed, and how to receive them so that you consider them when filling out this field. After creation, you can add tasks to run with this new robot, as usual.
Soon we will have more news
We hope you have enjoyed these new features. And soon we will bring you more content.
Be part of our community by joining slack, following the news in our documentation in English or Portuguese, and learning a lot in our forum.


